WordPress Media Library is a powerful central hub for managing all your images, videos, PDFs, and other media files. Access it via Media > Library in your dashboard, and organize your files in Grid or List view with built-in search, filtering, and editing capabilities.
Is your WordPress site cluttered with hundreds of images, videos, and files? Struggling to find the right image when you need it? WordPress Media Library is designed to solve exactly this problem.
The Media Library is one of WordPress’s most powerful yet often overlooked features. When used correctly, it speeds up your content creation process, improves your site’s performance, and strengthens your SEO.
In this comprehensive guide, you’ll learn everything about WordPress Media Library – from basic navigation to advanced optimization techniques. Whether you’re a WordPress beginner or an experienced user, this tutorial has valuable insights for you.
WordPress Media Library is the centralized system where all media files uploaded to your WordPress site are stored and managed.
The Media Library supports these file types:
– Images: JPG, PNG, GIF, WebP, SVG (with plugin)
– Videos: MP4, MOV, AVI, WMV
– Audio: MP3, WAV, OGG
– Documents: PDF, DOC, DOCX, XLS, XLSX, PPT
All these files are stored on your server in the wp-content/uploads folder, organized by year and month. For example, an image uploaded in January 2025 is saved to /wp-content/uploads/2025/01/.
You can access the Media Library via Media > Library in your dashboard or by clicking the Add Media button while editing any post or page.
Using WordPress Media Library effectively is critical for your site:
1. Time Savings: All your files in one place. With search and filtering features, you’ll find any image within seconds.
2. SEO Advantage: By filling in alt text, title, and description fields, you can optimize your images for search engines and gain organic traffic from Google Image Search.
3. Performance: By editing, resizing, and optimizing images, you can improve your page loading speed significantly.
4. Organization: Categorize your media files (with plugins) to maintain a clean, organized structure.
5. Consistency: Use the same image in multiple places and update it from a single location.
Log into your WordPress admin dashboard. Navigate to Media > Library in the left sidebar. Alternatively, click the Add Media button while editing any post or page.
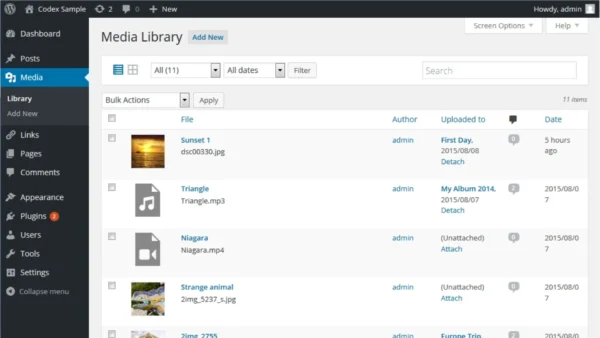
Once the Media Library opens, you’ll see all your uploaded files. By default, the most recently uploaded files appear at the top.
💡 Pro Tip: In Gutenberg editor, type /image or /gallery to quickly insert media blocks without opening the full library.
The Media Library offers two view modes:
Grid Mode: Displays thumbnail previews, ideal for visual browsing. Helps you quickly identify files.
List Mode: Shows file name, author, upload date, and size in a table format. Better for bulk operations and detailed information.
Switch between modes using the icons in the top-right corner.
💡 Pro Tip: In List mode, click column headers to sort files by name, date, or size.
Click the Add New button or drag and drop files directly into the library. You can upload multiple files simultaneously.
WordPress automatically creates different thumbnail sizes:
– Thumbnail: 150×150 pixels
– Medium: 300×300 pixels (maximum)
– Large: 1024×1024 pixels (maximum)
– Full: Original size
⚠️ Warning: Check your upload size limit. Default limits typically range from 2MB to 64MB. For larger files, you may need to update your hosting PHP settings.
Click on any image to open the detail panel on the right. This panel includes:
Alt Text: Text displayed when the image can’t load, also read by screen readers. Critical for SEO!
Title: The image title. Used when searching within Media Library.
Caption: Short description displayed below the image.
Description: Detailed description field. Usually shown on the attachment page.
💡 Pro Tip: When writing alt text, naturally include your target keyword. Example: ‘WordPress media library interface screenshot showing grid view’
In the detail panel, click Edit Image. WordPress’s built-in editor allows you to:
– Crop: Select a specific area of the image
– Rotate: Turn 90 degrees clockwise or counterclockwise
– Flip: Mirror horizontally or vertically
– Scale: Set new dimensions
When you save changes, WordPress creates a new version. Use ‘Restore Original’ to revert to the original file.
⚠️ Warning: Scaling down large images can cause quality loss. When possible, optimize the original file before uploading.
Use these options to find files in your Media Library:
Search Box: Searches within file names, titles, and descriptions.
Type Filter: Select Images, Audio, Video, or Documents from the ‘All media items’ dropdown.
Date Filter: View files uploaded in a specific month or year.
Author Filter: In List mode, use ‘Mine’ to see only your uploads.
💡 Pro Tip: For advanced search capabilities, install the ‘Media Library Assistant’ plugin. It enables searching by custom fields and categories.
In Grid view, click Bulk Select. Select multiple files to perform these actions:
– Delete Permanently: Remove selected files
– View Attachment Page: Open the file’s dedicated page
– Download: Save files to your computer (one at a time)
⚠️ Warning: Deleted files cannot be recovered! WordPress doesn’t have a trash feature for media files. Before deleting, ensure the file isn’t used anywhere on your site.
When editing a post or page:
Classic Editor: Click ‘Add Media’, select or upload a file, adjust size and alignment, click ‘Insert into post’.
Gutenberg (Block Editor): Click ‘+’, select ‘Image’ block, choose from Media Library or upload new.
In both editors, after inserting an image, you can configure:
– Size (Thumbnail, Medium, Large, Full Size)
– Alignment (Left, Center, Right, Wide, Full Width)
– Link (None, Media File, Attachment Page, Custom URL)
💡 Pro Tip: In Gutenberg, use the ‘Gallery’ block to display multiple images in an organized layout.
wordpress-media-library-guide.jpg instead of IMG_2847.jpg. Separate words with hyphens (-), not underscores (_).image-ñ-café.jpg cause problems on some servers and look bad in URLs. Use simple alphanumeric characters only.This usually stems from PHP memory limits. Add define('WP_MEMORY_LIMIT', '256M'); to your wp-config.php file. If the problem persists, add php_value memory_limit 256M to your .htaccess file or contact your hosting provider.
Set upload_max_filesize = 64M and post_max_size = 64M in your php.ini file. Alternatively, update PHP settings through your hosting control panel (cPanel, Plesk). Some hosts also allow .htaccess modifications.
Check file permissions. The wp-content/uploads folder should have 755 permissions, and files should be 644. Connect via FTP to fix permissions or use File Manager in your hosting panel.
Ensure GD Library or Imagick PHP extension is active. Check PHP Extensions in your hosting panel. Use Regenerate Thumbnails plugin to recreate thumbnails for existing images.
WordPress blocks certain file types for security reasons. For SVG, use Safe SVG plugin. For other types, you can add custom MIME types via functions.php, but consider the security implications.
This usually means too many files have accumulated. Use WP-Optimize for database optimization. Also clean unused files with Media Cleaner and delete old revisions.
The default limit varies by hosting provider, typically between 2MB and 128MB. You can increase this limit via php.ini or your hosting control panel. Most shared hosting allows up to 64MB.
All media files are stored in the wp-content/uploads folder, organized by year and month. Example: /wp-content/uploads/2025/01/image.jpg. This structure can be changed in Settings > Media but isn’t recommended.
No, WordPress doesn’t have a default trash feature for media files. Deleted files are permanently removed. That’s why regular backups are critical. Restoring from backup is your only option.
WordPress doesn’t offer folder functionality by default. However, you can install plugins like FileBird, Real Media Library, or Enhanced Media Library to create virtual folders.
WordPress blocks SVG files by default because they can contain malicious code. Use Safe SVG or SVG Support plugins to safely enable SVG uploads.
Use meaningful file names (e.g., wordpress-media-library-guide.jpg), add alt text and titles to every image, compress images, prefer WebP format, and add image sitemaps. Yoast SEO or Rank Math can help with this.
Use Media Cleaner or Media Library Assistant plugins to identify files not used anywhere on your site. Always backup before deleting.
Our SEO-friendly themes and optimized plugins will enhance your WordPress experience.